Tuesday, 25 November 2014

DIY Family Initial Artwork

DIY family initial artwork
I found this large ceramic letter 'P' at a car boot sale, it also happens to be my family's surname initial. Meet the Procters.

As P's go, it was quite cute anyhows, but I did think I could probably do something a bit more creative with it. 

So here's a really quick and simple DIY, it can be done in 30 minutes or less, even if you're not all that crafty.

You'll need:
  • A3 Clip Frame
  • Your letter (mine was ceramic, but you could use a cardboard one, available from places like hobbycraft - and then you can paint/spray it any colour you like)
  • Some strong glue, I used polycell adhesive, and that P ain't budging anywhere!
  • Wallpaper or giftwrap of your choice
  • Scissors/cutting knife
To make it:
    • Simply glue your letter to the outer glass of your clip frame, and hold it in place to dry. I just popped some heavy books of the top and left it while I got on with the rest
    • Cut your chosen paper to size
    • Once your letter is stuck solid to the glass, you can pop your frame back together
    • And voila!
    What I love about this piece, is that I can change it up whenever I fancy, just by changing the paper inside. What a versatile bit of artwork.

    If you decide to give it a go, hope you have fun!

    Monday, 24 November 2014

    4 of the best Christmas Gift Wrap 2014

    4 of my favourite Christmas Gift Wraps available for Christmas 2014
    I have a confession. I'm a gift wrapaholic.

    So much so, that this year, I've not been able to get on with any Christmas shopping yet as I've been held up by my inability to choose the perfect gift wrap theme.

    For me, the wrapping process is almost as important as the present itself. It doesn't matter how many presents I have to wrap, I go the whole yard with each and every single present, full ribbons, bows, you name it, it may take me 75 hours to get it all done, but I still do it... every. single. year.

    If you're like me and can't bear your presents naked, then we should start a club.

    Here are my shortlisted favourite 4 Christmas gift wraps I've seen so far:
    1. Deluxe Polka Dot Wrap from Next
    2. Kraft wild stags 3m roll wrapping paper from Paperchase
    3. Keep Cosy This Christmas Wrapping Paper by SOPHIA VICTORIA JOY
    4. Copenhagen Doors Gift Wrap from John Lewis
    Have you seen any gorgeous wrapping paper I've missed? 


    ps. eek! I think the polka dot gift wrap from Next may have won for me this year... Hope they still have some in stock!

    Sunday, 23 November 2014

    FREE printable rise & shine print

    Download my Rise & Shine poster FREE here

    It hasn't stopped raining here ALL DAY... how miserable.

    But it is England. And rain does happen quite a lot, so to cheer us all up and give us a little bit of motivation on those dull mornings I've designed a Rise & Shine print to raise our spirits. And it's available for you to download and print out for FREE! As a little thank you to you guys :-)

    Simply follow the link below, download the file, open the pdf and print it out.

    I'd suggest using a thin nice bright white card. I can't guarantee exactly how it will print out on your printer as they are all different but it should look something like the one in the image above!

    It's A4, but if you click the box that says 'fit to page' if you have it as an option, that should give you a nice even margin on most desk top printers. (It will enlarge well if you have an A3 printer.)

    And then pop it in a nice simple A4 frame (or whatever size you print it at) and you're good to go.

    Download the file now!


    I hope you enjoy the rest of your Sunday! If you do download and frame the print, please do tweet me a picture of it in place in your home, I'd love to see it!


    Saturday, 22 November 2014

    How to make your home cosy for Winter

    I use a LOT of candles and lighting around my home to create a warm and cosy feel in Winter

    As the nights draw in and the weather gets a bit crisper, I like to make my home super cosy. I discovered it's quite difficult to photograph candles and lights (as you can see above) but you get the idea. I use a LOT of candles and fairy lights around my home. A mixture of real candles and battery operated ones are ideal.

    And I don't care if my husband refers to the place as looking like a church, which he does, most days. I don't even care that it takes me about 25 minutes to switch everything off every night before I go to bed. It's cosy and that suits me.

    It doesn't suit my 7 year old son however, who I found stripped down to his pants earlier today as he was 'melting' apparently. Okay, maybe I need to reign in the cosiness just a little bit.


    If you're looking for ways to make your home more cosy this Christmas, here are some of the tricks of the trade that I use:

    Textured soft furnishings
    By using lots of different textures in your soft furnishings, it creates a cosy feel. Think fluffy, furry, velvet, knitted, all look great together and add warmth. And you can never have too many cushions and throws.

    All from Matalan available here
     Quilted Velvet Throw from IDYLL HOME LTD

    Low lighting
    Lights are key to a cosy atmosphere. Low lighting like lamps and my favourite, fairy lights. Remember, fairy lights are not just for Christmas.

    Fairy lights from QVS

    Plush shaggy rugs
    Rugs like the one pictured below are simply gorgeous. How welcoming does that look? I can imagine a nice romantic scene, a roaring log fire, all snuggled up on the rug. Until you realise the sofa is actually more comfortable than the floor, unless you're 4.

    Plush shaggy rugs from therugseller.co.uk

    Candles
    Scented, non-scented it doesn't really matter. Candles come into their own in the run up to Christmas. And there's no better way to create a cosy home. So long as it's not too cosy, they are quite a fire hazard after all and particularly dangerous with young children around, so another option is battery operated candles. I have loads of these and I love them. The ones I have flicker and glow, just like real candles, I got them from Dunelm Mill for next to nothing.

    ‘Winter’ candles from The White Company

    So before you reach for the dial on your thermostat this year, it's always worth seeing where else you can add some warmth to your home. You'll save some money in the long run.

    Do you use any other tricks to make your home cosy?

    Friday, 21 November 2014

    Chevron Love

    I'm in love with my Chevron rug from Next
    I'm absolutely obsessed with the chevron print but was a bit disappointed that stores in the UK didn't seem to be picking up on the chevron trend quite so much as in other countries.

    Well hats off to Next Home. I couldn't believe my eyes when they tweeted a picture of their chevron rug the other day and I just had to pick one up. It's available in a few different sizes, but I went for the hall runner (pictured above and below in my hallway), at only £40 I thought it was a bit of a bargain!

     If, like me, you're lovin' the chevron, I've done a quick round up for a chevron shopping list:
    1. Chevron cushion covers, Ebay Find them here
    2. Chevron Lampshade, Love Frankie Find it here
    3. Chevron Rug, Next Find it here
    4. Chevron A6 Travel Journal, Sparrow & Wolf Find it here
    5. Chevron mugs, Tonder & Tonder Find them here
    6. Chevron Photo Frame, House of Fraser Find it here
    7. Chevron fabric storage basket, Etsy Find it here
    Happy chevron shopping lovelies!

    Thursday, 20 November 2014

    Christmas Colour Palettes 2014: Mulberry

    Tonight, is our little town's CHRISTMAS LIGHT SWITCH ON!

    Thousands of us turn up, wrapped up all warm and cosy. Beautiful Christmas craft stalls line the streets, chestnuts roast on an open fire… we've even got penguins and reindeer to pet!
    And then it's the build up, a local celebrity appears, there's a big countdown AND BOOM! The lights go on.

    Okay, so it's usually a bit of an anti-climax, sometimes the lights don't even work, but for me and our family it marks the real start of Christmas.

    So whilst I'm in the Christmas spirit, I've been looking at some gorgeous colour palettes for Christmas decorating.

    Starting with this Mulberry Christmas Colour Palette… I'm seriously tempted with this and I LOVE the hanging baubles over the table - what a fab idea! (And I'm sure it would only be slightly annoying when you're talking over the table)

    From housetohome.co.uk
    What colour palette are you thinking of for Christmas 2014?


    Wednesday, 19 November 2014

    How to upcycle a stool for a childs room


    I was on the hunt for a mini-makeover project recently, and came across a perfectly fine, but a 'little bit boring in my book' black stool in my son's bedroom.

    Immediately I knew I wanted to jazz it up a bit, so I set to work and I made this (above) all with my very own actual hands.

    It was so easy to do, I highly recommend giving it a go this weekend.

    You will need:
    • A stool (or actually could be any small piece of furniture like a bedside table) This stool was £3 from Dunelm Mill
    • Sand paper
    • Comic
    • Scissors
    • Paintbrush
    • PVA glue
    How to make it:
    • Prep your item, give it a good clean all over and very lightly 'key' with sandpaper so the glue can stick better
    • Cut up your comic in to lots of individual pieces (not too big pieces). I cut out whole strips of the stories to put in the background and then a few things like logos from the comic to put on the top
    • Apply glue to the stool surface using your paintbrush, doing a section at a time so it doesn't dry out too quickly and then stick down each piece of comic, slightly overlapping all the edges
    • Once all the pieces are stuck down, paint over the top with more glue this will help flatten any edges and blend it all together
    • Finally, stick down the comic logos on the top, I used The Beano. Classic.
    • Generously apply another layer or two of PVA, it will dry completely clear but act as a seal.
    • Alternatively once it's all dry you could add a layer of varnish for extra protection
    And ta da! It's done

    Tuesday, 18 November 2014

    Perk of the job: Graphic Design


    Being a graphic designer isn't always quite as glamorous as some people think it is.

    It's ruddy good fun, and I'm so pleased it's what I do for a living, but for many designers, myself included, a lot of the work can be a bit mundane and corporatey.

    A perk of the job though is that your friends think you are 'da best' when you offer to do their personal stationery like wedding stationery. I've done A LOT of my friends wedding invites, here's two that I could lay my hands on – both match the themes of their weddings perfectly.

    I'll no doubt show you some graphic design work as I go along, as well as the home stuff and crafts... in fact I may even produce some free printable prints as that's something I make for my own home all the time. So keep a look out if you like funky prints round the home!

    In other news, I'm having a hair cut tonight. I've had long hair for like ever and tonight I may well be going for the big chop! Wish me luck.

    Monday, 17 November 2014

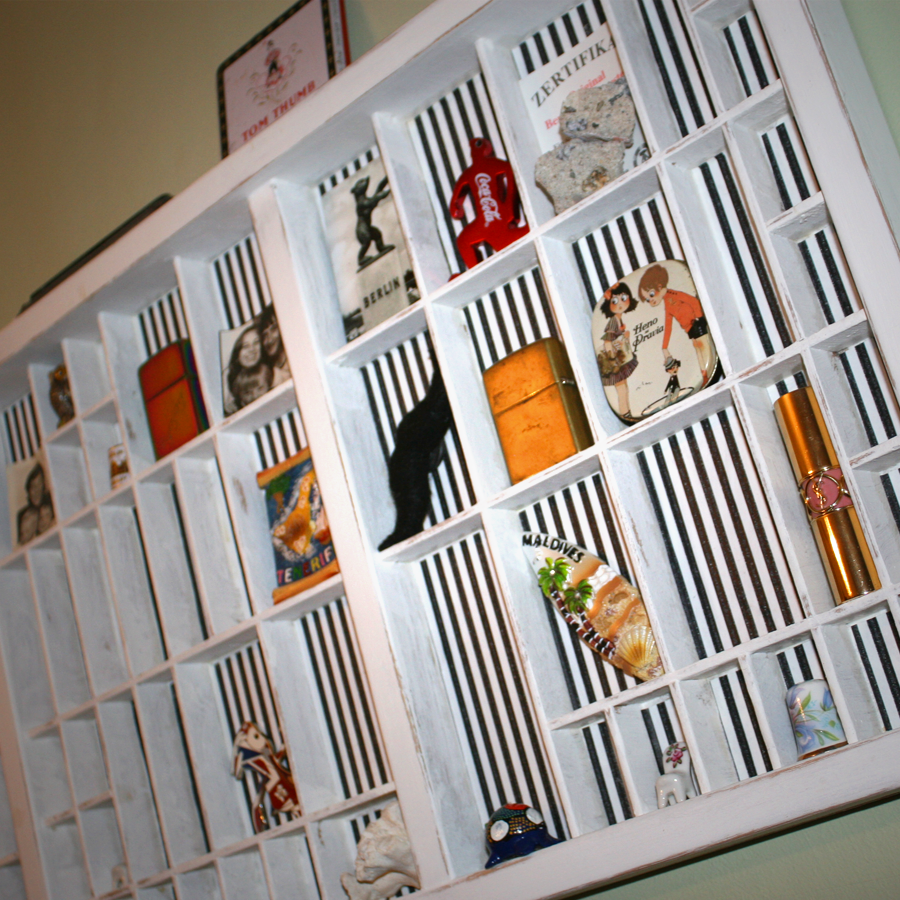
    How to upcycle a printer tray


    So this happened. 

    One morning I woke up and decided I really needed to upcycle a printer tray... as you do.

    I don't know about you, but once an idea like this hits me, I need to act on it pretty quick or else I lose interest quicker than you can say 'supercalifragilisticexpialidocious' and not that I'm one for boasting... but I can say that Pretty. Darn. Quick*.

    I jumped on ebay and this little bad boy was bidded on and bought within the hour.

    When it arrived, after I let out a few ermahgerd's and other choice expletives, I set to work:
    • Sanding down (lots of)
    • Hoovering up (lots of)
    • Painting white (lots of)
    • Watching paint dry (...ZZzz...)
    • More painting white
    • More watching paint dry (...ZZzz zzzzzzz...)
    • Yet more painting white
    • Sanding down AGAIN for an aged effect
    • More hoovering
    • PAINSTAKINGLY measuring and cutting out tiny squares of black and white stripey gift wrap
    • Gluing 1 million(ish - I can't be sure but it felt like it) pieces of black and white stripey gift wrap to each individual cubby hole back
    • Stand back and admired handy work (followed by 4 days of back ache and numb fingers)


    It's true. This was hours and hours of my life I'll never get back, but I was really pleased with the result.

    It's a piece for my home that's completely unique to me, and actually trying to fill it with little trinkets is quite fun. It's nowhere near full, but it's getting there.

    Here's how it looks now, semi full:


    Have you ever tried to upcycle a printer tray? Let me know how you got on :-)


    *ps. less than two seconds in case you're wondering!

    Sunday, 16 November 2014

    8 of the best advent calendars for Christmas 2014


    A long, long, long time ago, when I was a child... (okay so we're not talking Bethlehem era, but you get the idea, it was a while back) advent calendars were pretty basic. And there wasn't much choice.

    Roll on a few years (quite a few years if you're being picky) and now there are a whole host of amazing advent calendars. I don't know if people have just got more creative or if it's just that the internet has opened up world of creativity we never knew existed. Either way, we're spoilt for choice for advent calendars.

    Here are 8 of my favourites I've seen this year, actually all of these are available to buy on notonthehighstreet.com, or you can use them as inspiration!

    www.notonthehighstreet.com/peachblossom/product/advent-calendar-red-paper-bag-kit

    www.notonthehighstreet.com/littleellajames/product/fun-deer-advent-calender

    www.notonthehighstreet.com/thechristmashome/product/light-up-advent-calendar-house

    www.notonthehighstreet.com/instajunction/product/personalised-photo-christmas-advent-calendar

    www.notonthehighstreet.com/nuvonova/product/24-advent-calendar-pouches

    www.notonthehighstreet.com/littleellajames/product/gingerbread-man-advent-calender

    www.notonthehighstreet.com/poshtottydesignsinteriors/product/advent-calendar-envelopes-and-ribbon

    www.notonthehighstreet.com/posttea/product/pre-order-tea-advent-calendar-for-christmas

    I hope you enjoy looking through this gorgeous little lot of inspiring advent calendars. I know my kids absolutely love the build up of Christmas which all kicks off with the official opening of day one. Let me know in the comments if you've seen any others that have taken your fancy!

    Monday, 8 November 2010

    At last, Forever21 launches in the UK!

    Calling all Fashionistas! Ever lusted after clothes from an American fashion blog, only to realise you have no chance, unless you take a quick flight across the continents to grab yourself a bargain? (rendering the term 'bargain' slightly non-applicable).

    One of the main culprits that crops up A LOT in fashion blogs is Forever21, but fear not, in a high street fashion trade off, we gave them Topshop, now they are giving us Forever21!

    With the first UK store launching in Birmingham this Friday on 12th November, and the second in Dublin on 13th November, I for one am hoping they will filter through to all the main cities in the UK over the coming months.

    In a side note, I'm hoping to get back to some outfit posting real soon, once I've a) sorted out my winter wardrobe and b) got over this week of allergy testing at my local hospital.

    I've had some skin 'issues' for years now and have finally been referred for a week long allergy testing course. For this week at least I'm having to wear a very, VERY tight gym top to hold down the 50 sample patches attractively taped to my back. I am desperate to find out just what it is that I'm allergic to on Friday, although my current mantra is *Please don't let it be alcohol, please don't let it be alcohol... fingers crossed everyone!

    Friday, 5 November 2010

    Fireworks Food: Classic Chilli Con Carne


    I can only think of one thing I want to eat tonight, when I'm out in the pouring rain watching soggy fireworks with my 3 year old, saying 'oooh' and 'aaah' at all the right moments – HOT Chilli Con Carne in a delicious Jacket Potato! You just can't beat it.

    Here is Jamie Oliver's Recipe for Chilli Con Carne, just in case you get the same cravings, now I've mentioned it! His ingredients list is rather long, but I usually just knock certain bits out if I a) haven't got them in the cupboard or b) don't actually know what they are.

    And if you are out enjoying the festivities tonight or over the weekend, hope you have a fabulous time, and stay safe!

    ingredients

    • 2 medium onions
    • 2 cloves of garlic
    • 2 medium carrots
    • 2 sticks of celery
    • 2 red peppers
    • olive oil
    • 1 heaped teaspoon chilli powder
    • 1 heaped teaspoon
    • ground cumin
    • 1 heaped teaspoon ground cinnamon
    • sea salt and freshly ground black pepper
    • 1 x 400g tin of chickpeas
    • 1 x 400g tin of red kidney beans
    • 2 x 400g tins of chopped tomatoes
    • 500g good-quality minced beef
    • 1 small bunch of fresh coriander
    • 2 tablespoons balsamic vinegar
    • 400g basmati rice
    • 1 x 500g tub of natural yoghurt
    • 1 x 230g tub of guacamole
    • 1 lime


    To make your chilli

    • Peel and finely chop the onions, garlic, carrots and celery – don’t worry about the technique, just chop away until fine
    • Halve the red peppers, remove the stalks and seeds and roughly chop
    • Place your largest casserole-type pan on a medium high heat
    • Add 2 lugs of olive oil and all your chopped vegetables
    • Add the chilli powder, cumin and cinnamon with a good pinch of salt and pepper
    • Stir every 30 seconds for around 7 minutes until softened and lightly coloured
    • Add the drained chickpeas, drained kidney beans and the tinned tomatoes
    • Add the minced beef, breaking any larger chunks up with a wooden spoon
    • Fill one of the empty tomato tins with water and pour this into the pan
    • Pick the coriander leaves and place them in the fridge
    • Finely chop the washed stalks and stir in
    • Add the balsamic vinegar and season with a good pinch of salt and pepper
    • Bring to the boil and turn the heat down to a simmer with a lid slightly askew for about an hour, stirring every now and again to stop it catching

    Thursday, 4 November 2010

    Home Style: Easy peasy coffee table


    I saw this idea for an ultra easy-peasy, lemon-squeezy coffee table on another blog the other day, so thought I'd give it a try. I've not executed the idea particularly well here, although you get the idea!

    It's so simple, just pile up a big stack of your biggest hard-backed books, and voila, one unique coffee table.

    Try to use books that you won't want to look at for a while, if I now want to read my Russell Brand book I'll basically have to 'break' my new table to read it.

    And the great thing is, you can constantly update your table with different books depending on your mood. Try it out for yourself!

    Wednesday, 3 November 2010

    Wise words Sophia...


    Says Sophia Loren, with possibly the most beautiful eyes in showbiz history!

    Tuesday, 2 November 2010

    How to: Fall over in a dignified manner...

    This isn't me falling over (I'm not friends with Sarah Harding), but I feel for the poor lass, I really do...


    One of my very bestest skills (if you can call it a skill) is falling over. I've probably even blogged about it once or twice.

    My preferred falling over incidents (and most talked about) are, in order of preference:
    • That time I fell over at my friends summer barbeque, my heel got stuck in the grass and I was DOWN, face first, with mud all over my chin.
    • That time I fell over in the pub (which time I hear you ask? there have been a few), well that time when I landed in a kneeling position at the bar after getting my heel stuck in the doorway, it's one way of getting served soonest.
    • And that time I fell out of my car, again head first, and again after getting my heel stuck, this time in the hem of my trousers.
    Can you see the pattern forming?, they all involve 'heels'.


    Well, in the first of my 'Tuesday: How To's', I'm addressing this issue with some top tips for falling over in a dignified manner:
    1. Always try to break your fall. Head first falling hurts bad. And you wind up with mud on your face, which makes your already embarrassed state rather much worse.
    2. Feel free to let out a little girly squeal (unless you're a guy), it makes people feel sorry for you, like they would do a small child and they are less inclined to laugh.
    3. Please make sure you are wearing good knickers. It's bad enough to fall over, but if you give everyone a glimpse of your 'I need to do some washing knickers' - the humiliation will last a LOT longer, I promise.
    4. If you are of the falling over variety, try to make sure you are with someone at all times. Falling over on your own is possibly the worst type of fall. With no one to laugh it over with you really do just look like a wally, or a drunk, or a drunk wally.
    5. Always inspect your heels for 'pretend' defects after a fall, if in doubt, blame the shoes but make sure everyone notices you 'blaming the shoes'.
    6. Never admit to being hurt. Once the commotion has died down, feel free to walk round a corner and scweam and scweam and scweam, but not while people are still watching.
    7. Allow people to help you up - even if they are sniggering. If they are not sniggering, be warned, they will snigger when they tell all their friends on facebook what they just saw.
    8. And lastly, whilst difficult, if you happen to be walking along with your beautiful friend, try to compose your facial expression when falling, the lady above has got it all wrong, if you are captured on camera falling, a smile is much more flattering.
    Like with most things, falling over with dignity is an art form, it takes some practice. I practice a lot and I'm still not there, so don't worry if it takes you some time to perfect.

    What's been your best (or worst, depends on how you look at it) falling over experience?

    Monday, 1 November 2010

    Fashion: Cheryl vs Dannii


    Like many people, X-Factor seems to take up half my weekend these days. But for me, one of the main reasons I watch... is to see what Cheryl Cole and Dannii Minogue are up to in the style stakes.

    The girls are clearly having a full on fashion-fight each week and this week was no different.

    Before I get onto the clothes, let's just mention Cheryl's hair. Hmmm, I'm not digging it this year, Dannii is definitely winning the hair contest for me, what she can do with a simple short bob never fails to amaze me.

    Cheryl tried this red tinged hair a little while back, and my previous post on it is by far the most searched item on my entire blog, so it seems many people are curious to Cheryl's hair. Well, I'm not sure about it, and I think it's getting her down too, she seems a bit grouchy these days (although I suppose that could be to do with the rubbish year she has had, poor girl).

    Anyhow, back to the clothes. The top picture is from Saturday night, for me Dannii wins here in this gorgeous Marchesa dress. The picture below is from Sunday night, Cheryl wins for me here in her Ina Soltani dress (although she does look a teeny bit like she's jumped out of a box of quality street).

    So, who are you backing this week? Cheryl or Dannii?

    Sunday, 31 October 2010

    Random: Happy Halloween


    A likkle picture of my two little kidringtons, in their halloween outfits last year.

    Well Daisy isn't fully in her outfit, she later became a funky witch, and little Jo Jo in his little fat pumpkin outfit. Possibly the last year I'll get away with a cutie pie outfit for him now he's a proper boy and all cool and that.


    Hope you all have super fabulous halloween fun. Boo!

    Friday, 29 October 2010

    Scrummy Chocolate Fudge Cake


    Sorry if you can see dribble on this picture, I've been a' droolin!
    Chocolate Fudge Cake, mmmm, how delicious, give it a go this weekend and everyone will love you forever and ever amen. I am a learner in the cooking dept. but this isn't too tricky even for a numnuts like me.

    Ingredients
    200g plain chocolate, broken into chunks
    200g butter
    200g light brown sugar
    100ml soured cream
    2 eggs, beaten
    200g self-raising flour
    5 tbsp cocoa powder
    hundreds and thousands or whatever takes your fancy, to decorate

    For Icing
    100g plain chocolate
    170g can condensed milk
    100g butter
    So, start by h
    eating your oven to 160C/140C fan/gas 3 and if you can manage two things at once (I can't) line a 22 x 22cm square tin with baking paper. 

    Pop one piece of the chocolate in your mouth (optional), and add the rest of the chocolate, butter and sugar into a large pan with 100ml hot water and gently melt together. Set aside for 2 mins, then stir in the soured cream followed by the eggs.

    Finally, stir or whisk in the flour and cocoa like a mad woman, until lump-free, then pour into the prepared tin (unless you forgot to prepare it, if so, prepare it now). Bake for 50-55 mins until a skewer comes out clean. Sit the tin on a wire rack to cool.

    Meanwhile, make the icing (which sounds simpler than it really is). Gently melt together icing ingredients in a heatproof bowl set over a pan of barely simmering water, then leave to cool until spreadable.

    To decorate, carefully turn out the cooled cake and peel off the baking paper. Spread the icing over the top and scatter with hundreds and thousands, then cut the cake into triangles or fingers before serving.

    Now you can share your efforts with your loved ones, or alternatively, simply hide it in a cupboard and secretly eat it all when no one is looking. Scrummy Chocolate Fudge Cake: Done.